Wednesday, April 17, 2013

Comfort Food equals Banana Bread


For my family when things are out of control crazy things get forgotten; like the fresh bananas in the fruit basket. Sometimes we even like to intentionally let them turn the perfect brown for something sweet and savory and the perfect pick me up. Ok so I have lots of perfect pick me ups, but this one is very easy, quick, and nearly fool proof. If you forget a few ingredients it may or may not turn out nearly as great.

 
Nearly Foolproof Banana Bread
Ingredients:
1/2 Cup Butter...if I am in a hurry I will use Margarine straight out of the fridge since its soft cold
1 Cup Sugar
1 Egg
3+ Medium Brown Bananas I have used up to 5 and this still turns out great
2 Cups Flour
1/2 tsp Baking Soda
1 tsp Baking Powder
5 Tbsp Milk
I love that this is made with what I like to call real ingredients, ones that we almost always have in the kitchen. I admit I am most likely to be out of sugar.....I have a sweet tea addiction and can't help it.  These are the perfect stage to make banana bread; I love buying the brown ones from the store when they are deeply discounted and make up some to freeze. Getting bananas at the perfect stage helps with flavor, but if they are a little worse than these they will still work great. If they have turned to liquid mush then it's past time and best to freeze for smoothies later.
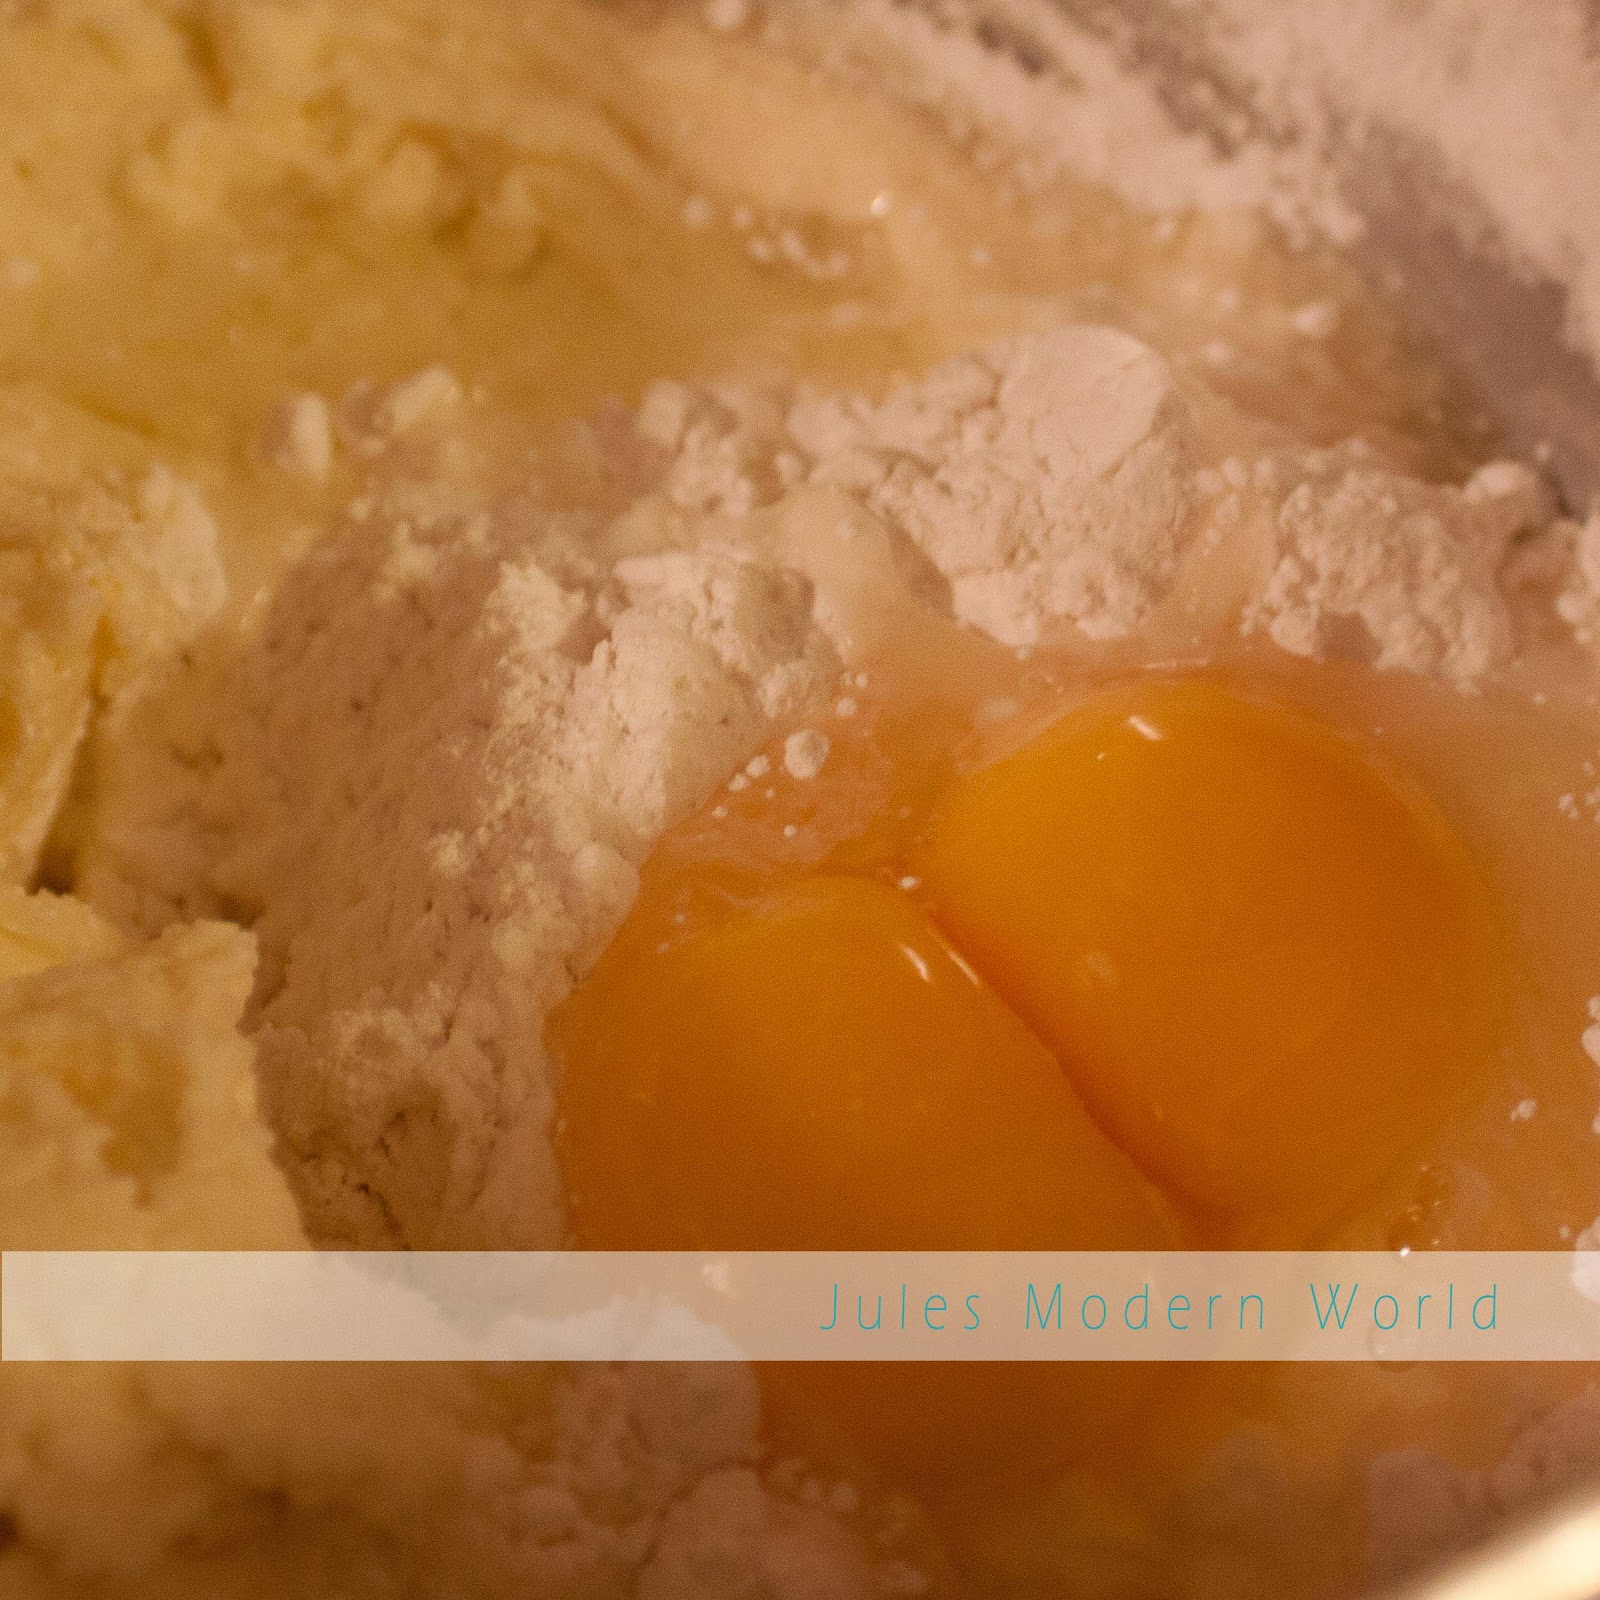
Contrary to most people's thoughts I do not pre mix the dry ingredients and jump right in. So throw the butter and sugar in the bowl and get to mixing. After the butter and sugar are well mixed add the egg and mix well. Once the egg is mixed in begin adding the bananas. I wanted to make sure that you saw the inside of the bananas since they look a little worse for the wear in the last photo. These are soft and I cut off any really brown areas. Then I just mix the bananas in until they are broken up, but not completely demolished. Leave some of the chunks for little surprises in the bread. 

Because the best part of comfort food is the ease, at this point just begin throwing in the dry ingredients. I try to separate the baking soda and baking powder but if I am in a hurry I just go with it and it always seems to work out. Once the flour, baking soda, and baking powder are mixed in add the 5 tablespoons of milk and mix until there are no pools of milk. Once everything is mixed together you are ready to put it into the pans. At this point I usually think oh no I forgot to grease the pans and I do love the bread to slide right out. So out comes the greatest invention ever...well at times like this I think this is the greatest invention.....the flour spray, oh how I love you. I use medium sized pans so I spray 2 real quick and divide the batter evenly. I jiggle the pans a little if the batter isn't spreading out evenly but that happens rarely.
 
If you know me really well you know that I hate high electric bills, so I do not pre-heat the oven. Just turn it onto 350 degrees, and put the pans into the oven. My oven takes about 5 minutes to get up to 350 so I just set the timer for 45 minutes and walk away. After 45 minutes you should have some really great smelling bread that is a nice golden brown and slightly cracked on the top. I also don't always check the inside if it looks like it does on the right. After about 5-10 minutes I will remove the bread from the pan. If you don't it will begin to sweat and you will have soggy bread.
 
After trying to resist the urge to pick it up and tear off chunks and eat an entire loaf, I do slice just one just to make sure it's perfect for my family to eat.


 The kid's do prefer to add butter while it's still hot!


For Printable Recipe click here.


Monday, April 15, 2013

Tax time is downright miserable….unless it’s also snack time


Well I am usually one of the first people in the country to file, as in the day I receive my W-2 I will get everything together and file. This year I was not nearly as organized and may have procrastinated beyond belief. This is partially due to my complete obsession with comparing itemizing with the standard deduction and my desk may have eaten my W-2 form…well I will say it was my desk. If you follow me on Instagram you saw my not so organized mess of a desk after it threw up all over the place.

Just in case you were wondering I did go the itemized route, but that is probably because after a nasty jaw bone infection, root canal, numerous trips to the doctor for said infection my daughter pushed the itemization up over the top!

Now to get onto the creation of one of my all time favorite healthy as long as you don’t eat the entire jar snack. Yes I have been known to eat straight from the jar and possibly the entire jar while mindlessly munching away at my desk. This also stores really well canned…you knew I would say it, as I hate making small batches of anything just to have to remake it a few weeks later. The suspense is killing you I know…my favorite healthy snack food is granola. I urge you to not overeat this like I frequently do. Seriously I add it to yogurt, sprinkle it on top of fresh fruit especially sliced strawberries, and even throw a little into my oatmeal for some extra crunch, because who doesn’t like a little crunch to break up their oatmeal monotomy.

This is not my original idea, because I am from the era that only beef stew is made in a crock, and only veggies were canned. Then I began the journey of making and canning all sorts of things to extend the time I can store them. I may need a pintervention as I am addicted to it, but here is the pin that started the granola making journey. While your there feel free to follow me, I will keep the pins coming because one of my favorite insomnia induced addictions is pinning food and watching workout videos from the fitness boards. You would think I would be motivated to actually exercise but nah I would much rather lay in bed and watch the workout videos on my phone. This does count as working out!

I do love the recipe from the pin as well as the blog that it came from that you can visit here. Please don’t get too hung up on making this recipe perfect if you choose to tackle it because when I first started making granola I sure did feel like the world might stop turning if it wasn’t perfect, but blah-o was what I had because every bite I thought man I wish there were more….until I found a combination that I loved and I perfected a way to store it really well. I tweaked but didn’t change the recipe much as the original is pretty great in my family’s book.

So I am going to begin with some things that I learned along the way that will make your life easier when making granola in the crock. First begin with the largest crock you have, I use a 7 quart oval one; you can use the round 4 quart as well. I choose the larger because I am messy and will have stuff everywhere; the puppies love this but I also have trouble stirring in the round one and end up burning the edges. There is nothing worse than burnt coconut, the smell the taste, even the look will make you want to hurl. Leaving the lid cracked means allowing all the moisture to escape. In the oval crock I give the lid a quarter turn, in the round one I will prop up the lid with my wooden spoon. When cooking granola if it doesn’t smell really great, add more moisture and spices right away or else you will have ho hum granola. Lastly do not use the nut chips made for cookies like I did when making this for this very write up (pretend the pics have real nuts pieces for me); this sounds like it would be a great idea but when you eat it you will think did the kids pick out all the nuts. This will also make the granola really dense in the jar which is causing me settlement issues, which means large chunks of granola. Not fun at all! I am thinking I will scrap the lot by using it as a base for granola bars, but haven’t decided what binder will go well with this taste.

 
Now that we have run down my list of screw ups let’s dig into making granola in the crock! Gather your crock, big ole spoon, and ingredients.


In case you have been living under a rock here is my crock. I don't promote any certain brand, but do promote getting one that will last as spending less today and then having to replace it in a short time is not my idea of being responsible with the money that I have worked hard to earn.  You can see that I also am double crockin; the baby in the back is so cute but doesn't hold much if you have a family.


Homemade Cinnamon Pecan Granola


5 cups of oats (old fashioned ones, not quick or steel cut)

1 ½ cups pecans (rough chopped)

1 ½ cups coconut sometimes 2 cups if I am in the mood to walk on the wild side

2 tablespoons cinnamon

1 tablespoon vanilla

¾ cup coconut oil

¾ cup honey


Measure and dump the oatmeal, pecans, and coconut in the largest crock that you have or the one you have chosen to use. Be sure to mix everything up really well before adding the coconut oil and honey.


Because I am all about easy, measure the coconut oil out in a 2 cup glass measuring cup and then put the honey right on top until you get 1 ½ cups combined. Then just pop this into the microwave for 10 second intervals until the coconut oil melted and the honey is thinned. Pour this over the granola and add the cinnamon and vanilla and mix really well.


Turn the crock on medium to low. If your crock is like mine you have 4, 6, 8 and 10 hour options. I like to use the 10 hour setting and be certain to stir every 30 minutes; I am prone to burning everything. This setting only requires 3 hours 30 minutes in my crock to cook. Be sure to leave the lid ajar to allow the steam to escape. You will know it’s done when there is no more moisture and the coconut is crispy. The crispy coconut is my favorite part of this granola.


If you plan on making several batches for storage, I find
 that writing the date made on the lid in black marker
works really well.
I leave the granola in the crock to cool 30 minutes and stir every 10 minutes to ensure it all cools evenly and thoroughly. I then jar this up into 3 sterilized quart sized jars and seal them. At this point I have to resist the urge to push the center of the lid to seal it….ok I may have just run over and pushed one but just one. As long as the jar is sealed this granola will last several months in the pantry as long as you keep it hidden from your family.  


I know everyone has a preference on how to eat granola, but my favorite has to be on either yogurt or fresh strawberries.


For printable recipe click here.


Sunday, April 7, 2013

Apples and TV...they just go together

The week has been exceptionally crazy, but some of it I may have brought on myself. The quick story is Tuesday evening after some of the worst customer service from our cable provider, I turned the cable service off at both my own and my mother's house.

Had I been thinking and not acted rash, I would have realized that left my less than 24 hours to determine what I was going to do and do it quickly so that the herd would be able to watch their favorite show Wednesday evening. Wednesdays are crazy long days and having technologically challenged parents did not help that day go any faster. So desperate times call for desperate acts.....and I decided I would find a way that would allow the herd to watch their favorite shows and I not be required to deal with awful customer service, because mindlessly watching TV is the herd's favorite past time. Hello Apple TV, I sure hadn't ever planned to buy one but now I wish I had oh so long ago.

There it is the tiny black box that saved
 my sanity!

A little about Apple TV in case you are like me and hadn't ever paid any attention to it, hey if it ain't broke why fix it is my motto. First you need a Wi-Fi....check I already had one. Next and I didn't know this until I went to plug it in, your TV needs to have an HDMI slot. Well if you are like me and have the mega I will herniate you if you try to move me box TV.....you better start begging to borrow one...in my case I had my eyes set on my son's TV. Pretty much I said you are grounded from your TV for so long for poor behavior that I am going to use it until I decide to buy a new one. Third you need an iTunes account...well if you are buying an Apple TV you probably have at least an iPhone. Last you don't need one but I recommend a hulu plus account....it's 7.99 such a small price for my sanity. If your on the fence you can see if a free account is more to your liking and in your budget. A side note is if you do not already have the iTunes Match, it is worth it unless you have a monstrous hard drive, which I do not so I gladly paid for the match.
As with any Apple product you better believe the user interface is top notch and this one does not disappoint. My phone picture is pretty terrible but my camera picture was worse with the glare off the screen. This is the home screen in case you haven't seen it. So far there hasn't been any time where there isn't something to watch, and I get to watch some of my all time favorite shows that have long been cancelled. One of the things I have learned is that the shows that are available free on the web, can be seen on the TV through airplay sharing. I haven't tackled this yet as there is no shortage of things to soak up my day.


In the spirit of Apple and as a way to celebrate my break from horrible customer service I decided that I needed to have a really great apple recipe to share with you. So I made one of my all time favorite things...well I have a lot of favorite foods, but if there is a choice I will always go for apple cobbler. So here is my super quick way to make your own apple cobbler.

Ingredients:
3 medium apples (I used red delicious ones that were getting wrinkly on my counter)
1 tablespoon cinnamon
2 tablespoons sugar
1/4 cup butter
1 cup flour
2 teaspoons baking powder
3/4 cup sugar
3/4 cup milk

First core, peel (only if you prefer, I didn't), and chop the apples. Add 1 tablespoon of cinnamon and 2 tablespoons of sugar to the apples and let them sit while you make the batter. To make the batter melt the butter in a 9"x9" or similar sized baking dish. I use the microwave and while it's working mix the flour, baking powder, sugar, and milk in a glass bowl until it's smooth. Once smooth pour this directly onto the melted butter. Pour the apples directly on top of the batter. Bake at 325 degrees for 45 minutes or until the top is golden brown.


I eat this straight up without any toppings, but feel free to add some vanilla ice cream on top!

For printable recipe click here.


Monday, April 1, 2013

Produce Co-Ops, Farmers Markets, & Pasta Salad

If you know me, you know that although it may appear that I am a true "Texan" the truth is that I hail from oh so far away well just Illinois, if you didn't know that hopefully you still love me. I have embraced the culture of my new hometown and love the people and the community, except I terribly miss the ability to get great produce year round. I remember like it was yesterday the very first time I set out to find great produce in December (this was 1996..wow I haven't lived anywhere this long). I had been getting all my favorite winter produce at the local grocery store before so that is where I headed. One word explains it all DISAPPOINTMENT! I then went to the local farmers market, where I quickly learned that the produce there came from similar warehouses that the national chains use....big huge fail there...why pay twice as much for the same sub par produce. There is a farmer's market in the closest city that is all confirmed local farmers that I love and buy my local honey from so I am not saying to not support your local farmers. Just be mindful, do your research, and stay within your budget. Since then I have been on the pursuit of great produce at a cost that won't break the bank....basically I resorted to shopping at large warehouse clubs, local grocers, chain grocery stores, and farmers markets and racking up the miles on my vehicle and consuming my entire weekends at a rapid pace.

I had a system and have been quite pleased with the healthy lifestyle my family leads, until my sweet neighbor turned it all upside down. In one of my many cooking marathons, she had an ice emergency and I took my entire ice bucket over to her. Where I found loads of really great produce, it wasn't immediately local or organic but looked really great. I was very envious and she began to tell me about a produce co-op that her friend had told her about. I immediately decided I would give it a try and visited their website, which caused a little confusion at first but all the information I needed was there and I decided to give it a whirl. I input my information on that Monday and couldn't wait until the pickup Saturday. Yes the produce is trucked in, but the value is through the roof and there is an organic option that is still a great deal. I believe in buying organic when I can but at the same time, as a single family income I must stay within my budget. So I showed up to pick up my produce with absolutely no preconceived thoughts or notions. The truck was late delivering the produce, so I was able to watch the volunteers meticulously checking the produce and separating it into everyone's basket, as well as meet some amazing new people. Picking up my produce couldn't have been easier and I had a nice assortment of items that I wouldn't have otherwise purchased and some of our all time favorites. Just to tantalize your senses here is a sampling of what I got without any additional items for a cost of 16.50. Although I did opt for additional items making my total 32.50, I wasn't fast enough to get a photo before my herd tore into the produce! What you don't see are the 8 ginormous potatoes, zucchini, lettuce, and cucumbers under the top items. The best part is seeing my family opt for fresh items instead of begging for a trip to the store to get packaged junk.

So long story short I wish the site closest to my home was every week, but since it's not I will have to find a resolution to that. Until then I will experiment with all the surprises that I get in my basket and share some hits and misses along the way. My first experiment was with some pasta, only because I opened the cabinet and it literally fell out at me while I was fishing around for the tea bags, I was in the midst of a sweet tea emergency!

This got rave reviews the night I made it from my son and mother, but for me it was just ok, so I hadn't planned on sharing it. But the next day, I had some for lunch and WOW! Please forgive my not so hot instagram photos as I had no intention of sharing this near fail, I guess this is proof that if at first you don't love something or someone to go ahead and give it another shot.


Fresh Dill Pasta Salad

1/2 box Radiatore pasta (approx. 8 oz) less if you like more veggies
6 small radishes
1 medium cucumber
1 Roma tomato
1 handful of  fresh dill
4 teaspoons of ranch dressing mix

First chop the radishes, cucumber, and tomato into small pieces then sprinkle with ranch dressing mix and mix well. This will allow the liquid from the veggies to create a dressing for the pasta. I then cut the dill into small pieces and added it to the mix. I let that sit while cooking the pasta. After the pasta is done drain and rinse with cold water until it is cool to the touch. At this point mix into the veggie mix and let sit overnight.

Remember that you get bonus points for storing this in jars! My kids loved half of a jelly jar for lunch and I had a pint size (holy pasta batman I shouldn't have eaten that much) for lunch the next day.


For printable recipe click here.

Tuesday, March 26, 2013

Cranberry Walnut Cereal

As a Mom with a full time job a quick breakfast in the morning is a must, this has been refrigerator oatmeal for months and the kids (well me too) are tired of oatmeal. So cereal has become our best friend for right now, but finding cereal that has a low sugar content to keep my sugar sensitive hyperactive son on his best behavior throughout the day is very difficult and if you do find some that doesn't taste like you are eating cardboard the price may kill you anyway. If you have seen my son on a sugar high you would understand this is to preserve my sanity and keep his teachers from giving up on teaching. I have also made a real effort to reduce the number of preservatives in the food that we eat on a daily basis as I believe preservatives are not helping the hyperactivity. I stumbled on this link for a Healthy Cereal from a juicing website that has some great tips for a healthy lifestyle, my disclaimer so to speak is they do not know who I am or even that I was inspired by their recipe to make my own cereal. Yes, we do incorporate juicing and smoothies into our everyday diet especially when its 100+ degrees during the summer months; the flip side is I work closely with both my own and my kids doctors who believe in a healthy balanced diet as a lifestyle not something you do for a few months then go back to the fast food. I encourage everyone to talk to their doctor, if you don't feel comfortable talking to your doctor find a nutritionist to work prior to making any lifestyle or diet changes.

Just a little teaser to get you in the mood for breakfast. Trust
me this is really amazing and will keep you from snacking all
morning long, or is that just me that snacks all morning long.

I was rummaging around my kitchen looking for ways to change up the recipe and to ensure my kids will not only eat the cereal, but love it. So I ran across some dried cranberries that were left over from making chocolate cranberry oatmeal. I measured out the 1 cup of nuts in my inspiration recipe and looked at it and thought this will not last very long at all and I need it last more than 1 day, so the recipe below was born. The serving size here is only a 1/2 cup. What how is that suppose to fill me up you say, trust me this is extremely filling and has no extra fillers that we have become accustomed to allowing us to fill the cereal bowl to the top. I came up with the serving size basically by going through a lot of this trying to gauge how much is a reasonable without being too much. For me this is a little closer to 1/4 cup, but ultimately I went with the 1/2 cup size that is also a single serving of oatmeal. When I first began making this and filled the bowl up then added milk it didn't take long before I thought what have I done there is no way I can finish this. Well I didn't finish it and the dogs got an extra treat in their bowls. I know they shouldn't eat people food so shhh don't tell anyone.
I use my fingers to spread the coconut oil, the bonus here is
that coconut oil is a super moisturizer for dry skin.

Since this is something that is very new to so many people, I am going to provide a lot of photos to ensure that you are successful your first time around. Plus when this is burnt it will stink terribly and I don't wish that on anyone.

Use a glass oven safe pan and rub coconut oil on the bottom to prevent the cereal from sticking during cooking. This doesn't need to be a lot at all. I put just enough on the pan to cover the bottom.
I do this first because I tend to forget and then have to scrub and scrape, which I hate!
Please note that I do not endorse any particular brands, this is
just what is readily available in my area and therefore on hand
in my pantry. The jar is honey from a local apiary, support
your local farms and farmers when you can.


Ingredients:

1/2 cup Coconut Oil
1/2 cup Honey (I encourage you to try local honey)
2 cups Walnuts
2 cups Oatmeal (old fashioned not quick oats)
2 cups coconut (I encourage you to go unsweetened if you can find it, I cannot find it so I use sweetened)
1 cup dried cranberries
2 tbsp cinnamon


I always buy the walnut halves and pieces as they are a little less expensive that the already chopped ones. I also like to control the size of the pieces so I choose to give them a rough chop with my favorite santoku knife.

I am sure if you are skilled using a single serve blender you can chop the nuts in one of those. I prefer not to use that method as the nuts get a little too pulverized for my likes, and I may be a control freak.


I also like to vary the size of the nuts between pieces size and larger almost half size. I like the variation and the texture that it gives the final cereal, but this is only my preference and can be changed to your preference. After the nuts are rough chopped I measure out 2 cups, this can be close enough if you chop a few too many nuts. After the nuts are chopped and measure out I dump them in the glass pan as that is where I everything up.


I also like to rough chop the cranberries as the size of these vary greatly out of the bag. I try to cut most of them at least in half. These are pretty sticky so they will stick to your knife. These also tend to get chewy during cooking which doesn't bother me but I am sure it would if they were left whole. If you cut a few too many, go ahead and throw them in the mix; this will not make a difference you will just have more fruit, which isn't a bad thing at all.


After I have the cranberries measured out, I just add them to the walnuts in the pan. I love the color of the cranberries against the walnuts, so had to share that here. As you can see my pan sits directly on the right side of my cutting board so this process goes very quickly.


Because I use a ton of oatmeal, I guess I really love oatmeal, I don't even bother to remove it from the cardboard package although I know I should. If you have ever tried to pour from those containers, you know that it makes a huge mess as it will not pour evenly. I know the inner seal has a pour spout but I almost immediately rip that off as soon as I get it home. So after months of pouring getting oatmeal all over my kitchen, I finally broke down and bought a funnel.


Yes, I who thinks funnels are for sissies and just a way to get us to part with more of our hard earned dollars bought a funnel. Let me tell you that was the best 2 bucks I spent. Just remember I won't tell anyone if you choose to buy a sissy funnel too, just wear dark sunglasses and a hat when you buy it and no one will ever know.


So after getting the 2 cups of oatmeal measured out I just dump it into the glass pan with the walnuts and cranberries. As you can see I am pretty methodical about dumping the ingredients into the pan. I just love the mix of colors as the ingredients are layered into the pan.


The coconut, I typically am not extra generous with, but I do try to get it to be close to 2 cups. This gives an overall sweetness to the cereal and I want the sugar to be kept pretty low. If you have been lucky enough to find unsweetened coconut, I will be jealous, but feel free to walk on the wild side and add an extra handful or two.


If you only read this caption, you must resist the urge to stop
here and eat it all. I had to take a picture for you before I
started munching away!

I literally then dump the coconut into the pan with the walnuts, cranberries, and oatmeal. This looks so amazing to me, I also am very tempted to just grab a handful and start munching away. Must resist the urge!


This is the fun part, carefully mix the Walnuts, Cranberries, Oatmeal and Coconut until it is all well mixed. I like to use a wooden spoon here, but I am sure metal or plastic will work just as well. At this point I also look for pieces of Cranberry or Coconut that have stuck together, if you have any just break them apart or consider it your bonus for working so hard.

This is the fun part, carefully mix the Walnuts, Cranberries, Oatmeal and Coconut until it is all well mixed. I like to use a wooden spoon here, but I am sure metal or plastic will work just as well. At this point I also look for pieces of Cranberry or Coconut that have stuck together, if you have any just break them apart or consider it your bonus for working so hard.
 
Once this is all mixed up get ready for the sticky part.I always use a 2 cup glass measuring cup as coconut oil is somewhat messy. Do the best that you can and scoop out 1/2 cup coconut oil and press it into the bottom of your measuring cup. Don't worry if it isn't perfect, you can see mine is far from perfect but is pretty close to 1/2 cup.

Note: If you like crunchier cereal you can double the coconut oil and honey and cook 60 minutes. When you remove the cereal from the oven be sure to lay it out on paper towel lined cookie sheets to allow any excess oils to be absorbed by the paper towels before transferring it to the jars.

Next I just add 1/2 cup of honey right on top of the coconut oil in the glass measuring cup. This was I can microwave it right in the measuring cup and have one less bowl to clean up.
Because I don't want to have to clean up my microwave after any type of sticky explosion, I accidentally put marshmallows in the microwave for a minute and they grew out of the measuring cup and basically filled the entire microwave with sticky white fluff. That being said the clean up was a nightmare. So now my rule is use extreme caution and only microwave in 10 second intervals when there the potential for sticky things to explode.
In my microwave after 20 seconds this is how the coconut oil and honey look. At this point instead of risking my afternoon to clean up a huge mess, I just stir the coconut oil and honey until the remaining pieces are fully melted. This won't take long at all, if the pieces are being resistant or just taking too long to melt I will smash them on the side of the measuring cup and then they melt pretty quickly.


After the coconut oil and honey are melted, they will stay separate in the measuring cup so don't worry about that. I give them a quick stir and then pour it over the cereal the best that I can. I then mix everything together until the walnuts, cranberries, oatmeal, and coconut are all covered in the melted coconut oil and honey mixture. Bake this for 30-45 minutes stirring every 10 minutes until the liquid is all evaporated.


After it's all mixed up I like to add the cinnamon on top by sprinkling it all across the mixture. You could completely do this before mixing, but I just prefer to add it afterward. You will want to make sure that as many of the pieces are covered in cinnamon much like the picture.


I set the timer for 10 minute intervals so I don't forget about stirring the cereal. To stir I basically push everything to one end of the pan and then pull back to the other end making sure the top is rotated to the bottom, then I spread it back out. 

After the 20 minute mark, the smell is beginning to spread throughout the house and it takes a ton of willpower to not snack on a few pieces, trust me if you can hold out the cereal is completely worth it.


After 30 minutes,  there was still quite a bit of liquid on the bottom of the pan, so I set the timer for another 5 minutes. After the 30 minute mark I always set the timer for 5 minute intervals because burnt nuts and coconut does not smell all that great. I also snagged a little bite for me..shh...I ate it without taking a picture so I will deny it, and it's just as amazing as can be.  When all the liquid is crystallized and the cereal is golden brown, I remove it from the oven. I let the cereal cool enough to make sure when I transfer it to jars condensation doesn't collect. While the cereal is cooling I make certain to continue to stir every few minutes to keep from having a single huge chunk of cereal.

Because I was also baking pound cake I was having a terrible time getting the cereal to cool so I transferred it to a cookie sheet for about 5 minutes and that did the trick. You know when the cereal is cool enough to jar up when it's no longer hot to the touch (warm is perfect to jar up, but hot will condensate and cause you trouble) and the cereal has gone from soft to crunchy.


You can see my canning jars are ready as I am getting ready to jar this up as I intend to save the cereal while we finish up some Raisin Almond that was not as successful the first go round.

Even if you don't intend to store your cereal I encourage you to use jars, they are always easily washable, have no chemicals, and will not melt if they get put on the bottom rack of the dishwasher. You can also get the plastic screw on lids, I bought my plastic lids on amazon here and they are pretty inexpensive, but considered an add on item. How I got around that was grouping all my add on items together into a single order, which worked out great. I love to get a box of random stuff, especially when they are all my favorite items.

Definitely take a whirl at trying to get your jar to seal, as this will take some practice; I will admit I am terrible at canning and may not always do things that a true canner would do. I do encourage you to make sure that the jars and lids are appropriately sterilized, I use the high heat setting on my dishwasher which is almost always filled with jars. If your mother is like mine she has said you cannot reuse lids, but as long as there are no knicks or rust I will reuse them and know that it's a 50/50 chance of not sealing but I walk on the wild side and take the risk.

While the cereal is still warm in the jar, I place the lid and ring onto the jar. Much like canning the cooling process will seal the jar; the shelf life is really undetermined because what my kids don't eat within a few weeks my mother will sneak out of my house to put on top of her yogurt.Today one of the quart jars sealed almost immediately, the other didn't and I happened to be cooking in the crock and moved the unsealed jar over next to the crock to see if the heat would coax the jar into sealing. The crock did not put off enough heat to get the jar to seal; I am sure my mother would have tried to heat the jar and cereal and use a new lid and ring. This wasn't necessary as my sweet neighbor came over to see what was going on, I think she smelled all the goodness and wanted to snack, and I gave her the jar that didn't seal since she loved it so much and would eat it right away.

My favorite way to eat it is with milk in a small bowl on a saucer, but rarely that happens in my house!

My mother on the other hand prefers to eat the cereal on top of her favorite yogurt, which is laden with dyes and processed ingredients, but I will take every inch of success that I can with my family and be happy that they have given up almost all the commercial cereals!


For a printable recipe click here.

Sunday, March 24, 2013

My Favorite Pound Cake

After a few warmer than usual days, today was not so warm and windy cold. Cold as in I had to get my coat and scarf to leave the house, cold as in my heat is on high in the truck, cold as in can I just get in bed and stay there! Cold as in it's a perfect day to think about summer while baking to warm up the house; when I think of summer I think of strawberry shortcake. Well it's only shortcake in spirit because I hate shortcake, but I sure do love poundcake especially light fluffy melt in your mouth poundcake. This one dish no matter where or when I eat it takes me to summer nights sitting on the patio with family and friends. Perfection!


I truly have never shared this recipe before, I have even hid the original recipe from my family to ensure that no one else would ever show up with the same dish to a potluck, because you can guarantee I will bring some type of strawberry and poundcake dessert. It is irrational but this is something that I worry about to the point that it will keep me up for several weeks knowing that a potluck is coming. But I have had my arm virtually twisted by my precious friend from design school. She is an amazing true Southern girl and has moved home to Mississippi, and I am in Texas....how can we have summer nights under the setting sun sharing a great summer dessert if we are so far apart.  So this is for you Angie, a truly amazing lady and true Southern Belle, we just won't think about everyone else who also have the recipe now!

Now down to the real reason we are here, the making of my favorite pound cake, this is by no means a healthy recipe so definitely enjoy in moderation.


First collect all your ingredients together, anything ingredient that is refrigerated will need to be room temperature. Everything is a basic pantry staple for most people with the exception of the cake flour and whipping cream. I have tried to substitute these for items that I typically have on hand, but once you have it this way you sure can't stand anything different. It has been so long since I tried to substitute the ingredients that I do not remember what works and what doesn't work substitution wise. If you come up with one that works, please share.

First you have to get your pan ready, I prefer using a bundt pan. Mostly because saying it makes me happy but this is also a good size recipe so you need to be prepared. I have a heavy aluminum bundt pan, which works wonderfully. I am not sure where you can purchase these, but mine came from an estate sale and was just a few dollars. If you are a bundt pan aficionado, my pan is to the right and I would love to know more about it. If you don't have one like this for years I used the cheapy one that my mother sent in UPC labels from syrup and it came in the mail....why do I remember this from so long ago...I really do not know why my brain retains so many random things. If you do not have a bundt pan or are making this with the intention of making a trifle with square pieces of pound cake you can use loaf pans. I have used 7 1/2"x 3 3/4" mini loaf pans using the same cooking time with great success. It is very important at this stage to butter and flour your pan or pans, yes you can use the spray as long as you use the one with the flour added. The outer texture will be a little different if you use the spray but not to the point of being noticeable.
 
Ever since getting a stand mixer, that is my go to piece of equipment when it comes to baking. My tip to you is never try to use your kitchen aid to attempt to break up cold butter....your whisk will get all bent up and you will have a deformed whisk for all eternity because replacing it is futile as you will do it again, maybe only I will do it again as I have bent a few lot of whisks beyond recognition with cold butter. I do have a new spare whisk for when mine becomes unrecognizable unusable. If you bend your whisk and all the wires are flattened out just do your best reshaping it and take it for a spin in your bowl to make sure it isn't hitting the bowl too bad.

Please note that when kitchen aid says
"Not Dishwasher Safe"
this isn't a suggestion it really should say if you put this in the dishwasher all the shiny pretty finish will become pitted and dull, so just don't do it. But maybe I am the only rebel out there who says I installed that dishwasher and I plan to use it for everything! In all seriousness the pitted top of the whisk and bent tines doesn't make my kitchen aid stand mixer any less of a excellent addition to my kitchen.


Now onto the important stuff, cream 3 sticks of butter and 3 cups of sugar together until it's light, fluffy and a pale yellow color.
Once it's light and fluffy add 3 cups of cake flour and 6 eggs alternating 1 cup of flour and 2 eggs until all the flour and eggs are incorporated and well mixed.
 
After the eggs and flour are incorporated and well mixed add 3tablespoons of vanilla extract. This is going to look like a lot, but trust me you will love the end result. After adding the vanilla mix on medium speed for 2 minutes or until the vanilla is incorporated throughout.


After everything is mixed together you should notice that the batter is getting lighter and fluffier. Add 1 cup of heavy whipping cream and mix for another minute. You may need to use a spatula to incorporate the cream at the beginning as it tends to splatter a lot. I just begin on low speed and work my way up to a medium speed. This will be very quick as once the whipping cream is added you are going to mix the batter for only 1 minute at which point this is what it should look like.

Once you have everything mixed together pour the batter into the pan or pans of your choice.

It is very important to preheat the oven to 325 degrees fully prior to placing the pan in the center of the oven. I have found that if you have many pans it is best to space them out so that there is plenty of air flow around the pans. Once you place the cake in the oven and shut the door do not open it again for 90 minutes, not even to peek until the time is up. This will be the longest time of your life, well maybe not but I am always glued to the oven door with the light on...I guess I am afraid it may run away..not really but I still tend to watch through the door a lot more than I would even check. The world won't stop spinning if you do open the door, but the cake will be denser, heavier, and will take longer to cook.

After the timer goes off, you can open the door and you should be able to see the top of the cake is golden and the edges are browned. I always like to check with a toothpick or butter knife in a location that won't be too noticeable if this is for sharing. If it comes out clean I transfer the pans to a waiting wire rack to cool slightly. Once the cake has cooled enough that I flip the cake out of the pan onto the wire rack to cool the remainder of the way to cool completely long enough that I can cut into the cake.

 
Once the cake is cooled completely, slice into pieces and serve with some strawberries and whipped cream while dreaming of summer nights with great friends and family.


I hope that you love this pound cake as much as I do and make a ton of great memories with friends and family while enjoying this on summer nights. Also please don't blame me if you show up to a potluck with it and there is none left when you get through the line, I tell my family if you want some you better get through the line early!


For a printer friendly recipe click here.